Having Conda environments on our HPC infrastructure also means that anyone can access a Jupyter Notebook environment as part of the Anaconda packages that are already or can be installed in a Conda environment.
This comes with a number of steps:
STEP 1 - Creating (or using) an "Anaconda" or Jupyter-enabled Conda environment
Perform these steps on one of our HPC systems - e.g. Discovery, Polaris, Andes.
First enable the conda command. We recommend putting this into your .bashrc file so it happens automatically every time you login.
$ source /optnfs/common/miniconda3/etc/profile.d/conda.sh
There is a bug in the conda command requiring a one time work-around. If you already have a .conda directory in your home this is unnecessary but it won't hurt anything if you run it again.
$ cd
$ mkdir -p .conda/pkgs/cache .conda/envs
Now, start up your conda environment.
$ conda create --name jupyter python=3.7 anaconda
The anaconda package contains jupyter, pip, pandas, and many more modules.
Alternatively, you can use (ie. activate) a "global" environment provided:
$ conda env list
# conda environments:
#
base                  *  /optnfs/common/miniconda3
anaconda2                /optnfs/common/miniconda3/envs/anaconda2
anaconda3                /optnfs/common/miniconda3/envs/anaconda3
or meet in the middle and clone an existing environment for customization, or create a more minimal one (not full Anaconda).
$ conda create --name myanaconda --clone anaconda3
or
$ conda create --name minianaconda pip jupyter pandas
STEP 2 - Start Jupyter Notebook on HPC
This step is also performed on the HPC system.
Once you have (created and) activated an environment that has the jupyter module installed (eg. anaconada3), you can run Jupyter Notebook
$ conda activate anaconda3
(anaconda3) $ jupyter notebook --no-browser
Here's a sample output if JNB launches successfully:
[I 14:29:37.697 NotebookApp] The port 8888 is already in use, trying another port.
[I 14:29:37.698 NotebookApp] The port 8889 is already in use, trying another port.
[I 14:29:38.620 NotebookApp] JupyterLab extension loaded from /optnfs/common/miniconda3/envs/anaconda3/lib/python3.8/site-packages/jupyterlab
[I 14:29:38.621 NotebookApp] JupyterLab application directory is /optnfs/common/miniconda3/envs/anaconda3/share/jupyter/lab
[I 14:29:38.625 NotebookApp] Serving notebooks from local directory: /dartfs-hpc/rc/home/e/d35398e
[I 14:29:38.625 NotebookApp] The Jupyter Notebook is running at:
[I 14:29:38.626 NotebookApp] http://localhost:8890/?token=1f93a9973a8f83df66c0261af351cb3ab91640acfa6d9b92
[I 14:29:38.626 NotebookApp]  or http://127.0.0.1:8890/?token=1f93a9973a8f83df66c0261af351cb3ab91640acfa6d9b92
[I 14:29:38.626 NotebookApp] Use Control-C to stop this server and shut down all kernels (twice to skip confirmation).
[C 14:29:38.657 NotebookApp]

    To access the notebook, open this file in a browser:
        file:///dartfs-hpc/rc/home/e/d35398e/.local/share/jupyter/runtime/nbserver-13901-open.html
    Or copy and paste one of these URLs:
        http://localhost:8890/?token=1f93a9973a8f83df66c0261af351cb3ab91640acfa6d9b92
     or http://127.0.0.1:8890/?token=1f93a9973a8f83df66c0261af351cb3ab91640acfa6d9b92
The last line contains all the information you need to proceed with Step 3.
STEP 3 - Create an SSH "tunneling" connection to HPC
This step is performed on your local system (laptop, desktop, etc. - not polaris/andes/discovery).
We are going to create an SSH tunnel that will allow your locally installed browser to connect to the Jupyter Notebook now running on HPC (eg. polaris or andes)
To create the tunnel, you need to find out what port JNB is running on. That information is embedded in the output that was displayed when launching JNB in Step 2. The port number is the 4 digit integer (XXXX) that comes in http://localhost:XXXX or in http://127.0.0.1:XXXX.
In my example:
http://localhost:8890/?token=1f93a9973a8f83df66c0261af351cb3ab91640acfa6d9b92
Where the port is 8890. That port number might be different every time you run it and for every user, depending on availabilities at the time.
Leave the terminal window running JNB on HPC open and open a fresh terminal tab/window to create the SSH tunnel. You are already familiar with the ssh command, we are going to add a couple of flags and arguments:
$ ssh -NfL 8890:localhost:8890 d35398e@polaris.dartmouth.edu
Where:
XXXX is the port number reported in the JNB terminalyournetid is your NetIdhpc_system is andes or polaris, or one of the Discovery nodes (more advanced)
So in my case, the command will be:
$ ssh -NfL 8890:localhost:8890 d35398e@polaris.dartmouth.edu
This might ask for your password and then return. Again, like most Linux/UNIX utilities, SSH succeeds quitely and fails loudly. So if you don't see an error message, it worked! Keep this window open!
STEP 4 - Access your JNB using your locally installed browser
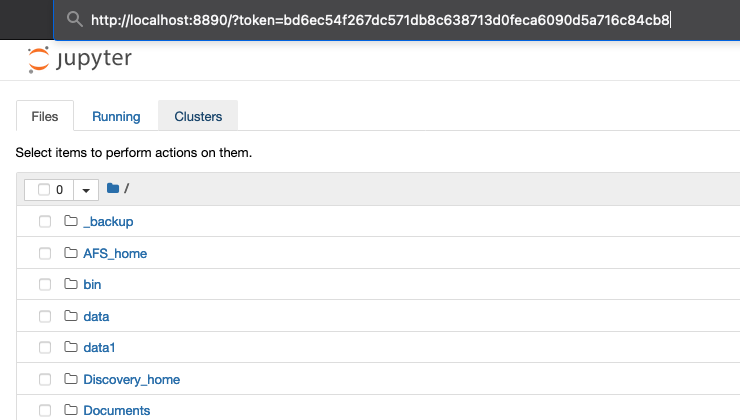
If you go back to the terminal window running JNB and copy the localhost URL at the bottom, and paste it in your favorite browser's URL bar:
In my case:
http://localhost:8890/?token=bd6ec54f267dc571db8c638713d0feca6090d5a716c84cb8
This will open a JNB in the browser, pointing at your DartFS home space.
You are now ready to use JNB on HPC!
Troubleshooting
Port errors occasionally occur an might look something like this:
$ ssh -N -f -L 8890:localhost:8890 d35398e@polaris.dartmouth.edu
d35398e@polaris.dartmouth.edu's password:
bind [127.0.0.1]:8890: Address is already in use
channel_setup_fwd_listener_tcpip: cannot listen to port: 8890
Could not request local forwarding
This means that the port on your computer is already in use by another application and needs to be released in order to then listen to Jupyter on HPC.
To 'release' a port, you can try the following steps:
- In your Terminal, run
$ lsof -i:<port-number>
This will list the processes listening on the specified port-number.
- Record the number in the "PID" (second) column of the output
- Run
$ kill -9 <PID>
to release the Jupyter network port.
This will end the process occupying the port and allow it to accept new connections.
Finally, re-issue the command from Step 3 above (ssh -NfL..... tunnel command for the localhost)
Example:
$ lsof -i:8890
COMMAND  PID     USER  FD  TYPE       DEVICE SIZE/OFF NODE NAME
ssh   17767 username  7u IPv6 0xb011d5f5e4e1fb03   0t0 TCP localhost:ddi-tcp-2 (LISTEN)
ssh   17767 username  8u IPv4 0xb011d5f5fd98cfe3   0t0 TCP localhost:ddi-tcp-2 (LISTEN)
$ kill -9 17767
$ ssh -NfL 8890:localhost:8890 net_id@polaris.dartmouth.edu